Yesterday, I spent a lot of time setting up byte64.com, particularly trying to setup HTTPS and connecting it to a Google Compute Engine Machine. I learned lots and suffered just as much.
I started with a single E2 compute engine VM and had Google Cloud install a wordpress service on it. From there, I looked into how to setup HTTPS. There were two options:
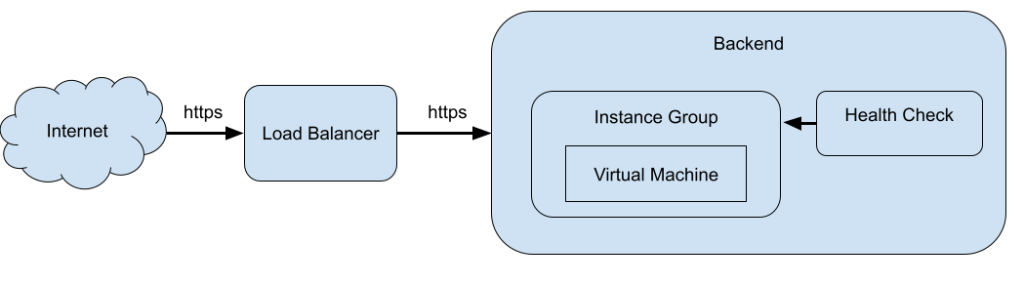
- Use a load balancer which people can connect to via HTTPS and then route the traffic to my VM, or
- Setup HTTPS directly on the VM.
In my head I was hoping for a Google Cloud native approach and so I tried the load balancer.

How hard could that be? The first step was to determine the protocol between the load balancer and the virtual machine. Google Search recommended either raw http traffic or to use https and a self-signed certificate on the virtual machine, since it wouldn’t be exposed to end users. Sounded great.
Now, in setting up the load balancer you need a backend service. For a backend service, you need a health check and an instance group. For an instance group you need an instance template. So, Google Cloud “guided” me through making all of these things, though it felt like I was doing it in the wrong order. Eventually, I made the instance group and template from my one VM. My VM got shutdown and a new one was started in the instance group. Consequently, some of the wordpress configuration referred to the old VM’s ip, so I needed to SSH into the new VM and edit those settings.
For the health check, I simply was looking at the landing page via HTTPS. By backend service wrapped this all up — just look at HTTPS on the instance group and use the health check.
Finally, to setup the load balancer, I got a static frontend IP and added an HTTP to HTTPS redirect. I also pointed the load balancer to my backend. I needed an SSL certificate to serve HTTPS traffic. Google provides a managed certificate service, which is nice. I needed to add a CNAME route in my DNS settings in GoDaddy so Google can tell I own the domain. It looks like it’s not a one-time-check, so it’s now a permanent fixture of my DNS config.
Finally, I added a self-signed certificate to my VM. By going directly the VM’s IP over HTTPS I could see the blog, but it came with a “Not secure” warning in Chrome.
With everything setup, it was time to test it. Or really, I was testing and iterating as I went having all sorts of problems. I used the built in Google Cloud AI assistant for advice. It wasn’t clear how much of my configuration it could see and how much it couldn’t. Despite all its help, the load balancer wouldn’t forward requests to my backend.
I decided to switch the traffic between the load balancer to the backend to HTTP. This required changing firewalls, the health check, the backend and the load balancer. I could finally connect to byte64.com over https, but I still got a “Not secure” warning in Chrome. I think WordPress was serving up some old links or internals over HTTP. I was getting some redirection loops as well.
If I wasn’t going to wipe WordPress and start over, I needed to get the connection between the load balancer and the backend over HTTPS. I suspect that the HTTPS requests I had tried before were rejected due to self-signed certificates. So, I went about learning how to install SSL certificates on my backend. You can’t use the Google Managed ones, because they need to be updated on a regular basis and Google doesn’t provide a tool to update your machines. As it turns out, using open tools this is all pretty easy.
“Let’s Encrypt is a free, automated, and open Certificate Authority brought to you by the nonprofit Internet Security Research Group (ISRG).” They suggest using the certbot tool for maintaining your certificate. The certbot tool is from the EFF. I found there website pretty clunky. It was hard to find the right binary that worked with Apache for WordPress. The only installation options were snap and pip. Eventually I found the python3-certbot-apache package for apt. Likely I should be using pip directly. From there the instructions were simple, HTTPS worked well directly on my VM and after changing all the intermediate systems back to HTTPS, I finally got the whole system working.
Now I can move on to deploying my SSTable server and linking to it from wordpress.
~Andrew
Leave a Reply